Having some animations can make your website look cool and engaging. If you come across some impressive animations, you might want to create similar effects on your website. This can be done with Flash or JavaScript, but it’s very technical and can slow down web performance due to taking up a lot of resources. Another easier way is using Cascading Style Sheets (CSS), with CSS Animations.
Behind the scenes, the code that makes CSS animations run is highly efficient. So in many cases you’ve get much better performance than another animation method like using JavaScript or heavy resources like “video” disguised as an animation.
In this article, we’ll talk about what CSS Animation is, how to add animation to your WordPress with and without plugins.
What is CSS Animation
CSS Animation refers to the technique of creating movement and transitions for elements on a webpage. It’s commonly used to make websites more engaging and interactive. To create an animation, you need to use keyframes. Keyframes define specific points in the animation and describe how the element should look at each of those points.
Here are the main properties used in CSS Animation, explained in simple terms:
- animation-name: The name of the animation you want to apply.
- animation-duration: How long the animation lasts from start to finish.
- animation-timing-function: The speed curve of the animation, or how the animation progresses over time (e.g., starts slow, speeds up, then slows down again).
- animation-delay: How long to wait before the animation starts.
- animation-iteration-count: How many times the animation should repeat.
- animation-direction: Whether the animation should play in reverse on every other cycle.
- animation-fill-mode: What styles should be applied to the element before the animation starts and after it ends.
How to add CSS Animation to WordPress?
Without Plugins
There’s a lot to learn about CSS animation, so we’ll just work through a short example so you can get a feel for how to pull it off on your website. Using your own custom CSS animations opens up a world of opportunity, but also complexity. So if experimenting with code isn’t your thing you can skip down to below this section for our simpler walk-through using plugins.
Technically, you’ll have to do four steps below.
Create CSS Animation file
First, you can name the file something like `animations.css`.Then define the keyframes for your animation. In this case, l want to create an animation called `octopus jumping` with the specified animation properties.
@keyframes octopus-jumping {
    0% {
      transform: translateY(0);
    }
    50% {
      transform: translateY(-50px);
    }
    100% {
      transform: translateY(0);
    }
  }
Upload your CSS file
After that, I need to upload the CSS file to the my site
1. Log in to the WordPress dashboard.
2. Navigate to “Appearance” > “Theme Editor.”
3. Make sure the theme is active and select the `functions.php` file from the list of theme files on the right side.
4. Copy the CSS animation code I created and paste it into a new file named `animations.css`.
5. Upload the `animations.css` file to your WordPress theme directory. I can do this via FTP or by using the file manager in your hosting control panel.
How to Add the Code to activate Your CSS File
1. Open your theme’s `functions.php` file. This can be found in your theme folder.
2. Add the following code to CSS file:
  function enqueue_custom_css() {
    wp_enqueue_style('custom-animations', get_template_directory_uri() . '/animations.css');
  }
  add_action('wp_enqueue_scripts', 'enqueue_custom_css');
Apply the file in WordPress
1. Identify the element where you want the animation to occur, for example, a `<div>` with the class `octopus`.
2. Add the CSS properties to the desired element within your WordPress post or page. I can do this in the “Additional CSS” section in the Customizer or by editing the theme files directly.
  .octopus {
    animation-name: octopus-jumping;
    animation-duration: 10s; /* 10 seconds */
    animation-timing-function: linear; /* Adjust as needed */
    animation-delay: 1s; /* 1 second */
    animation-iteration-count: 4; /* 4 times */
    animation-direction: alternate; /* 'alternate' for back and forth animation */
3. Save the changes, and CSS animation is active on WordPress site
With Plugins
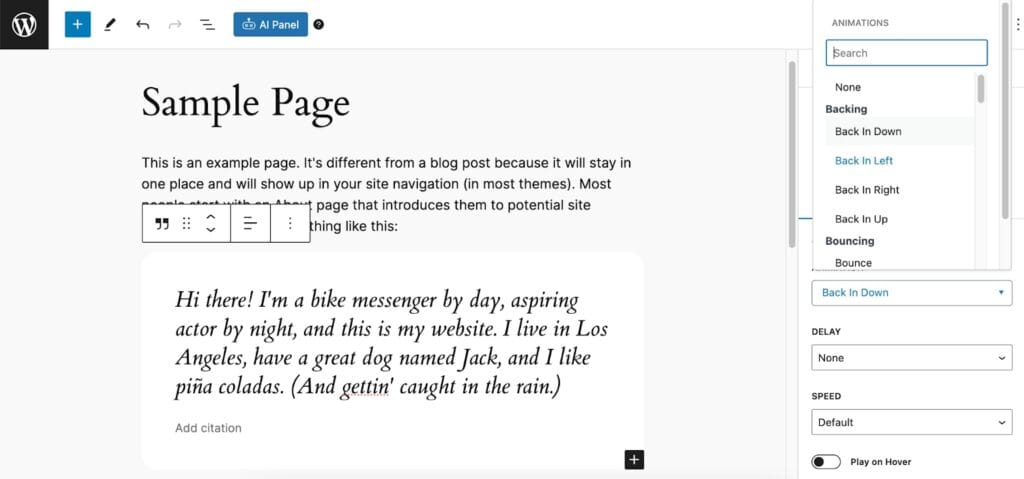
The easiest way to add cool CSS animation to your WordPress site is by using the Blocks Animation plugin.
This free plugin lets you add animation effects to any block on your site without writing any CSS code. It also includes typing effects and ticker-style effects for text and numbers.
- First, you need to install and activate the Blocks Animation plugin.
- After activating the plugin, open any page or post in the WordPress editor.
- Click on the block you want to animate. Then, select the ‘Block’ tab on the right side menu.
- Click to expand the ‘Animations’ section. You’ll see three options:
Animations: Short effects that run once when the page loads.
Count Animations: Effects that animate numbers.
Typing Animations: Effects that make text look like it’s being typed out.

- Choose an Animation
For basic animations, click the dropdown menu next to ‘Animation’ and select an effect from the list. The WordPress editor will show a preview of the effect so you can see how it looks.
- Customise the Effect
Delay: Set a delay to make the animation start later. For example, choose ‘One Second’ to start the animation one second after the page loads.
Speed: Adjust how fast or slow the animation plays.
You can preview the effect anytime by clicking ‘Replay Animation’.

- If you want to animate text or numbers:
– Highlight the text or number.
– Click the downward arrow in the toolbar.
– Select ‘Count Animations’ or ‘Typing Animations’ from the dropdown menu.
If these options are grayed out, make sure you’ve highlighted the right content (e.g., you can’t use ‘Count Animations’ if you’ve only highlighted text without any numbers).
- After adding the effect, you can change the speed and set a delay if needed using the dropdown menus.
- Once you’re happy with the effects, click the ‘Publish’ or ‘Update’ button.
Now, when you visit your WordPress site, you’ll see the animations in action.
Adding custom CSS Animation to WordPress using the theme customiser
– Go to your WordPress dashboard.
– Navigate to Appearance › Customize.
– Scroll to the bottom of the customizer menu.
– Select the Additional CSS section.
– The Additional CSS tool allows you to add your custom CSS code directly.
– It’s very user-friendly, letting you see how your changes look on both mobile and tablet versions of your site.
Remember to ensure your site looks good on all screen sizes is a top priority these days, right?
FAQ
Do animations added via CSS impact the performance of a WordPress site?
Animations added with CSS can impact the performance of your WordPress site, especially if they are complex or excessive. To optimise performance, consider using lightweight animations, limiting the number of animated elements, and refactoring your CSS code regularly. Additionally, test your site’s loading speed after adding animations to ensure optimal performance.
How can I combine CSS animations with SVG graphics to create interactive visuals on a WordPress site?
Combining CSS animations with SVG graphics on a WordPress site allows you to create intricate and interactive visuals. You can animate different elements within an SVG file using CSS properties like fill, stroke, and transform, along with CSS animations like keyframes and transitions to achieve dynamic effects such as morphing shapes, animated icons, and interactive illustrations.
How can I ensure cross-browser compatibility for CSS animations on a WordPress site?
Ensuring cross-browser compatibility for CSS animations on a WordPress site involves testing your animations in various browsers and versions to identify and address any compatibility issues. You can use CSS prefixes, feature detection libraries like Modernizr, and polyfills to ensure that your animations render correctly across different browsers.